Understanding the Different Types of Carpet
There are several types of carpet, and each one is designed for a different look, feel, and level of durability. The right choice depends on how you use your space, how much traffic it gets, and how much maintenance you want.
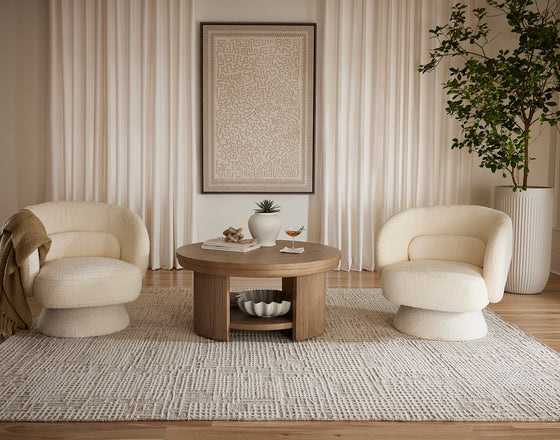
Designers say carpet is still widely used today because of its comfort and practicality in everyday spaces. According to Better Homes & Gardens, modern carpet remains a popular choice, especially in bedrooms and living areas where comfort matters most. The material you choose plays a direct role in how your carpet looks and performs over time.
Home Carpet One is a family-owned business, and we take a different approach than big box stores. We spend time explaining your options and helping you find the carpet fiber that truly fits your home.
What Are the Most Common Types of Carpet Fibers?
Most types of carpet flooring today are made from either natural or synthetic fibers, and each one has a clear purpose based on durability, cost, and comfort. Almost every carpet on the market today is made from one of seven primary materials:
Wool
Wool blends
Nylon
Polyester
Triexta
Polypropylene
Natural fibers (e.g., sisal, jute, etc.)
These fibers are spun into yarn and then woven or tufted into carpet backing.
Synthetic fibers like nylon and polyester dominate the market because they are more affordable and easier to maintain, while natural fibers like wool offer premium performance and longevity. In fact, synthetic fibers make up the majority of modern carpet production due to cost and durability advantages.
While the construction process is fairly straightforward, the fiber itself plays a major role in how a carpet looks, feels, and performs over time. Understanding the differences between carpet fiber types can make the difference between choosing a floor you love for years and one you wish you'd reconsidered.
At Home Carpet One, we've been guiding Chicago homeowners through carpet choices since 1970. Whether you're renovating a vintage Ravenswood bungalow or updating a modern Loop condo, we've helped thousands of customers find the perfect carpet fiber for their space.
Fiber Type
Relative Cost
Lifespan
Durability
Best For
Wool
$$$ (premium)
20 to 30+ years
Very High: natural resilience, resists matting and crushing
High-end spaces, bedrooms, and eco-conscious homeowners wanting a long-term investment
Wool Blends
$$$ (premium)
Long-lasting
Very High: wool's longevity with added stain and abrasion resistance
High-traffic family rooms wanting a luxury feel with easier upkeep
Nylon
$$ to $$$ (mid to high)
Long-lasting
Very High: most resilient synthetic, revives with cleaning
High-traffic areas, hallways, stairs, entryways, and busy households
Triexta
$$ (mid-range)
Long-lasting
High: superior to polyester, just behind wool and nylon
Homes with kids and pets, family rooms, and play areas
Polyester
$ to $$ (value)
Moderate
Moderate: soft but prone to matting in high traffic
Bedrooms, formal dens, and low-to-medium traffic or sunlit rooms
Polypropylene
$ (most affordable)
Moderate
Moderate: resists moisture and stains but crushes under heavy furniture
High-spill areas, basements, sunrooms, and secondary living spaces
Natural Fibers (Sisal, Jute)
$$ to $$$ (specialty)
Varies
Varies: strong underfoot but moisture-sensitive
Dry, climate-controlled rooms, entryways (sisal), bedrooms (jute), and area rugs
Wool Carpet
Wool carpet has long been the gold standard for residential flooring, offering a unique combination of natural strength and high-end design. Because it is a protein-based fiber derived from sheep's hair, it possesses an inherent resilience that many synthetic fibers struggle to replicate over time.
Look
Wool is incredibly versatile from a design standpoint. Its opaque fibers excel at hiding soil, keeping the carpet looking "new" between cleanings. Whether you are looking for deep colors or intricate woven patterns and textures, wool can be crafted to achieve virtually any aesthetic, from traditional elegance to modern minimalism.
Feel
Beyond its visual appeal, wool offers a luxurious, tactile experience. It has a natural "crimp" that acts like a spring, providing a comfortable, cushioned feel underfoot that resists matting and crushing even under heavy furniture or high foot traffic.
Performance
Wool is a powerhouse for a healthy home. It is naturally hypoallergenic, flame-resistant, and helps manage indoor air quality by absorbing pollutants and regulating moisture. As a sustainable, biodegradable material, it is the premier choice for environmentally conscious homeowners looking for a long-term investment that can last 20+ years.
Shop Hera Carpet
Wool and Synthetic Blends
For homeowners torn between the benefits of wool and the practicality of synthetic fibers, blended carpets offer a good solution. Most wool blends (e.g., Pristine Plaid) consist of approximately 80 percent wool combined with 20 percent synthetic fibers (typically nylon or polyester).
Look
Blends capture the sophisticated, matte aesthetic of wool while gaining the design flexibility of synthetics. Depending on the mix, a Nylon blend can add a subtle, elegant sheen to the carpet's surface, while a Polyester blend can enhance color clarity and vibrancy. This combination allows for intricate patterns and diverse textures that remain crisp and defined over years of use.
Feel
This category maintains the high-end, cushioned feel that wool is famous for, but with a slight twist. The addition of synthetic fibers can make the carpet feel even softer to the touch or more "elastic." You still get that signature wool "bounce," supported by the structural reinforcement of a synthetic backbone.
Performance
Wool blends offer strong performance with added durability. By adding 20% nylon or polyester, the carpet gains increased resistance to abrasion and improved protection against stains, areas where pure wool can sometimes be sensitive. The result is a high-performance floor that offers the longevity and air-purifying benefits of wool with the "low-maintenance" perks of a synthetic, making it an ideal choice for high-traffic family rooms.
Nylon Carpet
Since its debut in 1938, Nylon (e.g., Always Natural) has remained the industry benchmark for synthetic fiber. Engineered from a robust combination of carbon, nitrogen, oxygen, and hydrogen, it is designed specifically to withstand the rigors of a busy modern household.
Look
Nylon is highly versatile and holds dyes exceptionally well, offering a vast array of vibrant colors and styles.
Feel
Known for its impressive structural "memory," Nylon feels firm yet comfortable underfoot. Its high-density fibers are designed to snap back into place after being stepped on, preventing the flattened, matted sensation often found in high-traffic hallways or entryways.
Performance
This is where Nylon truly shines. It is the most resilient synthetic fiber available, with an unmatched ability to "rebound" during professional steam cleanings. When treated with stain-resistant finishes, it becomes a powerhouse against spills and soil, making it the ideal choice for families who need a high-performance carpet that can be revived to its original appearance year after year.
Polyester Carpet
Polyester carpet has evolved to become more sustainable. Many polyester carpets are made from recycled materials, including plastic bottles, which gives them an eco-friendly edge (though wool is still best from a sustainability perspective).
Look
Polyester is known for its exceptional softness and vibrant color retention. It resists fading from sunlight better than many other fibers, making it a solid choice for rooms with lots of natural light.
Feel
If softness is your top priority, polyester is hard to beat. It offers a luxurious, velvety texture that feels incredibly plush underfoot. This makes it a perennial favorite for "barefoot" areas of the home where physical comfort is the primary goal.
Performance
While polyester excels at resisting water-based stains and fading, it is best suited for low-to-medium traffic areas like bedrooms or formal dens. It lacks the structural "bounce back" of wool or nylon, meaning it is more prone to matting and crushing in high-traffic hallways. However, for the right space, its combination of stain resistance and value provides a high-performing, beautiful flooring solution.
Triexta Carpet
Triexta is one of the newer synthetic fibers on the market, and it has gained serious attention for good reason. You might recognize it by the brand name SmartStrand. This fiber was developed to combine the best qualities of nylon and polyester while addressing some of their weaknesses.
Look
Triexta maintains its "just-installed" appearance exceptionally well. Because the fiber's stain resistance is built directly into the DNA of the material, rather than applied as a topical coating, it won't wear off or wash away over time. This ensures the colors stay bright and the textures remain defined, even after years of professional cleanings.
Feel
One of Triexta's standout qualities is its incredible softness. It offers a silkier, more luxurious tactile experience than traditional nylon, making it a favorite for family rooms and play areas where comfort is a top priority.
Performance
Designed for the chaos of a busy home, Triexta has become a go-to choice for homes with kids and pets. Triexta offers exceptional stain resistance (often even better than treated nylon).
While it sits just behind wool and nylon in terms of raw structural "spring-back" over several decades, its resilience is far superior to polyester, allowing it to stand up to heavy daily wear without showing significant matting or crushing. Another benefit is that Triexta is partially made from renewable resources, specifically corn glucose, which appeals to buyers looking for more sustainable options.
Sisal, Jute, and Other Natural Fibers
Beyond wool, several other natural fiber options bring unique texture and character to a space and offer a sophisticated, organic alternative to synthetic carpeting. Sisal and jute fibers are two of the most common. These materials bring a distinct architectural character to a room, appealing to homeowners who prioritize sustainability and earthy, "brought-from-nature" aesthetics.
Other natural fiber options include seagrass and hemp, each with its own texture and performance characteristics. These materials are often used in area rugs or as accent pieces rather than wall-to-wall installations.
Look
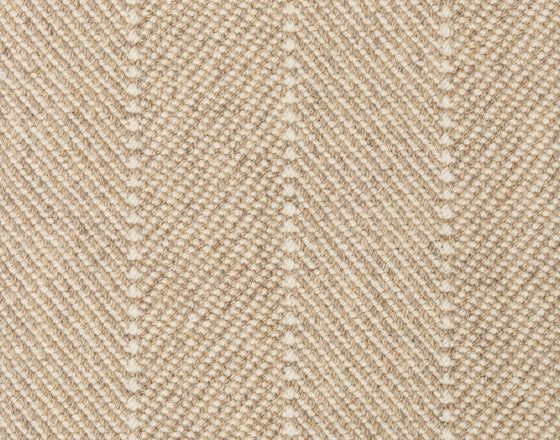
This category is all about texture and "visual weight." Sisal (from the agave plant) offers a crisp, consistent woven pattern that adds structure to a space, while Jute provides a more relaxed, chunky, and casual appearance. These fibers are typically left in their natural tan, beige, and golden tones, though they can be woven into intricate patterns like herringbones or chevrons that synthetic materials simply cannot replicate.
Feel
The tactile experience varies greatly by fiber. Jute is the softest of the plant-based options, offering a t-shirt-like gentleness that works well in bedrooms.
Conversely, Sisal is much tougher and can feel coarse or "scratchy" under bare feet. For this reason, these fibers are often used as area rugs layered over softer carpets or installed in "shoes-on" areas like entryways and home offices.
Performance
These fibers are incredibly strong but require a specific environment. Sisal is durable and stands up to heavy foot traffic without shedding or matting.
However, most plant fibers are highly absorbent, meaning they do not handle moisture or liquid spills well and are prone to staining. While they are biodegradable and eco-friendly, they perform best in dry, climate-controlled rooms where their natural beauty can be preserved.
Polypropylene
Polypropylene carpet has been available since the 1950s and has gained increasing popularity in recent years, particularly among Chicago homeowners looking for value without sacrificing quality. Cost is one of polypropylene's biggest advantages.
It is significantly more affordable than wool while still delivering dependable performance. Often used in both residential and commercial settings, this fiber offers a practical balance of value and dependable performance.
Look
Despite its budget-friendly reputation, polypropylene doesn't limit design options. Polypropylene is highly versatile from a design perspective, available in a vast array of textures and patterns, allowing for a wide selection of options to choose from.
Because the fiber is "solution-dyed" (the color is added while the fiber is still a liquid), it possesses incredible colorfastness. This means it won't fade even when exposed to harsh sunlight or heavy cleaning, making it an excellent choice for bright sunrooms or basement "man-caves."
Feel
Modern manufacturing allows Polypropylene to be crafted into various piles, from low-profile loops to softer, more decorative textures. It generally feels denser and less "elastic" than nylon, providing a sturdy, firm surface underfoot that works well in utility-focused spaces.
Performance
This fiber's greatest strength is its resistance to moisture and staining. It is virtually impossible to stain with water-based liquids, and it resists mold and mildew better than almost any other fiber.
It is more prone to crushing under heavy furniture compared to wool or nylon. Its low cost and strong resistance to moisture make it a high-value choice for high-spill areas or secondary living spaces.
How Do Carpet Pile Types Affect Performance?
The structure of the carpet pile changes how it feels, wears, and cleans over time. Carpet is generally made in two main pile styles, cut pile and loop pile, and each one performs very differently in real homes. The way the fibers are built directly impacts comfort, durability, and maintenance.
Cut Pile Carpet
Cut pile carpet is made by cutting the yarn loops so the fibers stand upright. This creates a soft, plush surface that feels comfortable and works well in bedrooms and living spaces.
It looks more traditional but shows footprints and wear more easily. It also needs more upkeep in high-traffic areas.
Loop Pile Carpet
Loop pile carpet keeps the yarn loops intact, creating a tighter and more structured surface. It feels firmer and holds its shape better over time. This style is more durable and easier to clean, but it can snag if something catches on the loops.
High-Pile Carpet
High-pile carpets have longer fibers that create a thicker, softer feel. They are best for comfort-focused spaces like bedrooms. They trap more dirt and show wear faster, so they require more frequent cleaning.
Low-Pile Carpet
Low-pile carpets have shorter fibers that create a flatter, more compact surface. They are easier to clean and more structured in appearance. They hold up better in high-traffic areas and are the most practical option for busy homes.
How Does Carpet Density and Padding Impact Durability?
Density and padding matter just as much as fiber type when it comes to long-term performance. Carpet density refers to how tightly the fibers are packed together. A denser carpet holds its shape better and resists wear over time, even in busy households.
Padding also plays a major role in comfort and lifespan. A quality pad helps absorb impact, reduce noise, and prevent premature wear, which is why it should never be overlooked during installation.
What To Know About Carpet Maintenance and Cleaning
Regular carpet cleaning is key to protecting your investment and keeping your floors looking new. Most carpets need routine vacuuming and periodic deep cleaning. Dirt buildup can break down fibers over time and shorten the life of your flooring.
For spills and stains, acting quickly is critical. Learn the right way to handle messes with this guide on removing carpet stains. Professional cleaning is also recommended at least once a year for most homes.
How to Choose the Best Carpet Fiber for Your Home
The right carpet fiber depends on how you use your space, your comfort preferences, and your budget. High-traffic areas need durable fibers like nylon or Triexta, while bedrooms can prioritize softness with wool or polyester.
Think about maintenance, too. Some fibers resist stains and wear better, while others need more care to stay looking new. Learn more about durability in this guide on the lifespan of carpet.
Frequently Asked Questions
What Is the Best Carpet for High-Traffic Areas?
Wool, nylon and Triexta are the best options for high-traffic areas.
Wool's natural resilience lets it bounce back from heavy foot traffic and resist matting, which is why it remains one of the most durable fibers available.
Nylon offers similar structural memory and snaps back into place after constant use, helping it hold its look over time.
Triexta delivers comparable durability with better built-in stain resistance, making it ideal for busy homes.
All three outperform polyester and most natural fibers in areas that see constant use.
What Is the Best Carpet for Pets?
Triexta is one of the best options for homes with pets because it resists stains and holds up well to daily wear. It handles accidents better than most other carpet fibers.
Solution-dyed nylon is another strong choice, especially for larger pets. Solution-dyed carpets also help hide wear, while delicate natural fibers should be avoided in pet-heavy spaces.
What Is the Most Durable Carpet Fiber?
Wool is one of the most durable carpet fibers available. It has a natural ability to recover from pressure, which helps prevent matting and long-term wear.
With proper care, wool can last for decades and maintain its appearance longer than many synthetic options. Its durability and lifespan make it a strong long-term investment.
What Is the Softest Carpet Fiber?
Wool and polyester are known for their soft feel. Wool offers natural comfort, while polyester provides a plush texture at a lower cost.
Triexta also delivers strong softness with added durability. Nylon can feel comfortable, but it is usually chosen for performance over softness.
Is Wool Carpet Worth the Investment?
Wool carpet is a strong investment for homeowners who want durability and natural materials. It can last 20 to 30 years or more with proper care.
It also resists fire, helps manage indoor air quality, and holds its shape over time. While it costs more upfront, its long lifespan adds long-term value.
How Does Carpet Compare To Hard Flooring?
Carpet offers more comfort and warmth compared to hard flooring. It also provides better traction and reduces the risk of slipping. Hard flooring is easier to clean, but carpet provides a softer and quieter living environment.
Is Carpet a Good Choice for Basements?
Carpet can work in basements if moisture is controlled. Synthetic fibers like polypropylene perform better in damp areas. It is important to use proper padding and moisture barriers to avoid mold or damage over time.
How Often Should Carpet Be Replaced?
Most carpets last between 5 and 15 years, depending on the material and traffic. High-quality options like wool or nylon can last longer with proper care.
Signs like matting, odors, or visible wear usually mean it is time to replace your carpet. Regular maintenance can help extend its life.
What is the Best Carpet for Stain Resistance?
Triexta and solution-dyed carpets offer the strongest stain resistance, since their color and protection are built into the fiber itself. These materials resist spills better than many other options, making them ideal for homes with kids, pets, or high daily use. Wool also has natural stain resistance thanks to its protective lanolin coating, as long as you blot spills right away before they have a chance to set in.
What is the Difference Between Carpet and Rugs?
Carpet is usually installed wall-to-wall, while rugs are smaller and can be moved easily. Both are made using similar materials and construction methods.
Carpet is better for full-room coverage and insulation. Rugs are better for layering style and adding accents to a space.
Can Carpet Help With Noise Reduction?
Carpet naturally absorbs sound, which makes it useful in homes with multiple floors. It can reduce noise from footsteps, voices, and movement. This makes it a strong choice for bedrooms, offices, and shared living spaces where quiet matters.
Buying Carpet for Long-Term Value
The best choice comes down to matching the carpet to how you actually live, not just how it looks in the store. Think about traffic levels, comfort, cleaning needs, and how long you plan to stay in your home. Each of these factors will point you toward the right material and construction.
At Home Carpet One, we take a hands-on approach that big box stores cannot match. Our team walks you through real samples, explains how each option performs, and helps you make a decision that fits your space long term.
Stop by our showroom in Chicago today to see the different types of carpet in person and get expert guidance.